E-Mag

Friday, October 31, 2008
~Autumn Fantasies~
DB_Autumn_Fantasies.jpg)
This tutorial was written by me on 10-31-08, and
is intended for those with at least a
general knowledge of PSP. Any resemblance
to another tutorial is completely accidental
and unintentional.
To complete this tutorial you will need the following:
A tube of choice I am using the wonderful work of
Deacon Black which can be purchased HERE
A scrap kit of choice I am using Autumn Harvest from
Scraps by Storm which can be purchased HERE or HERE
Once we have gathered all of the items we have chosen
to work with it is time to begin.
1. Open new canvas 600 x 600 fill white.
2. Copy and paste a frame from your chosen kit.
3. Using your magic wand click inside your frame, then go to
selections, modify, expand by 10
4. Create new raster layer. Open a paper from your kit or one of choice
then copy and paste into selection. Now move this layer beneath your frame.
Selections, select none.
5. Go to effects, texture effects, texture. And choose a texture you like
to give your paper a more worn look.
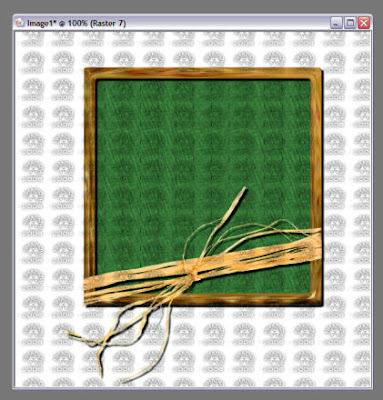
6. Let's go back to your frame layer.
Add a drop shadow of choice. Mine is V & H 4 Blur 3 Opacity 100
you should have something similar to this at this point
7. Open your tube, copy and paste as new layer. Resize and position as desired.
If a little of the top of your top rises over the frame no problem.
8. Duplicate your tube layer, move the original layer beneath your frame.
make sure you use your eraser tool to remove anything that goes
below the bottom edge of your frame.
9. Go to adjust, blur, Gaussian blur radius 10.
Now add the same drop shadow used on your frame.
10. Duplicate this tube layer, and move the top copy above your frame below
the unadjusted tube.
11. Select your unadjusted tube layer and go to layers, merge, merge down.
This will combine the unadjusted tube layer with the copy of your blurred tube.
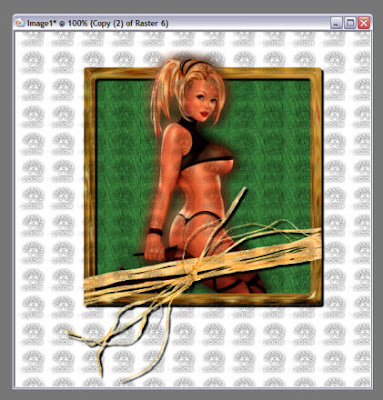
12. Using your eraser tool remove the lower portions of the tube to expose the
bottom of your frame. This should give the effect of your tube sitting in a window
with the lower portion inside and the upper portion outside.
At this point you should have something like this.
13. Now add any decorations or embellishments that you want.
14. Resize by 70%. Add artist copyright information, your watermarks or taggers mark,
15. Add name go to layers merge, merge all and you're finished!!
Thank you for taking the time to try this tutorial.
I hope you enjoyed it.
Subscribe to:
Post Comments (Atom)
Grab My Blinkie

I CT For


My Fav Places


My Licenses


0 comments: