E-Mag

Sunday, February 19, 2012
Under The Ocean Blue

Under The Ocean Blue
This tutorial was written for use by those with a basic
understanding of PSP. Any similarity or resemblance to
Another tutorial is purely coincidental and accidental.
To begin we will first need to gather our supplies.
1) A tube of Choice. I will be using the swimmingly beautiful work
Of Creepie Cuties which can be found HERE
@ Artistically Inclined Licensing
2) Bella Mermaid Scrap kit by Lizquis Scraps
Which can be found HERE
3) Obviously a font of choice
4) All effects used come standard with PSP
Now that we have gathered our fairly simplistic list of
Supplies we are ready to begin.
1. Open a new canvas 700 x 700 transparent.
2. Go to your color pallet, make the stroke Black, and the fill color null
3. Using your preset shapes, elipse, create a circle a little
less than the size of your canvas. Line width 10 with
anti alias, and create as vector checked
4. Once you have your circle the desired size go
to Objects, Allign, Center in canvas
5. Now convert the vector to a raster layer.
7. Using your magic wand click on the inside of your circle
8. Go to selections, Modify, Expand by 5
9. From the Bella Mermaid Scrap kit open paper 6 or as it
Reads in the file papel6, copy and paste as new layer, move the paper
below your circle layer
10. Go to Selections, Invert Selection, then click delete.
11. Go to Selections, Select None
12. Copy and paste your tube as a new layer. Position as desired beneath
The circle layer, but remain above the paper layer.
13. Duplicate your tube layer and move to original above your circle layer.
14. Make your original tube invisible then make the duplicate active.
15. Using your erasure tool, remove a few pieces of the tube on one side
That stick out past the circle.
16. Make the original tube layer active and visible once again.
17. Now using the erasure tool again, on the same sections of the tube you removed before, remove from your original tube. This should give the effect of your tube coming out of the frame or window behind it.
18. Now we make the background layer invisible, go
to layers, merge, merge visible.
19. Duplicate your image layer and move the original above the copy
20. On your original go to Image, Resize, Resize to 80%
21. Make your duplicate layer active and reduce opacity to 40%
22. Go to Effects, Texture Effects, Blinds
With the following settings:
 23. Again go to Effects, Texture Effects, Blinds
Same settings but uncheck Horizontal so settings look like the following:
 24. Again make sure your background layer is still invisible
Then go to layers, merge, merge visible
25. Reposition your image as you like, and add elements from the scrap
kit. Be sure to use what matches the tube you’ve chosen, and place
Where you think it looks best.
26. Resize by either 60% or if using by pixel resizing
Resize to 420 x 420
27. Add any word art or phrase you want, Artist Copyright info, and name
28. Make your background layer visible, and if saving as a .png then go to layers, merge, merge visible. If you wish to save as a .jpeg you can either go to layers, merge, merge all (flatten), this will automatically make your background white, or you may make your background layer a color of your choosing then go to layers, merge, merge all
I hope you enjoyed this tutorial. Feel free to share any comments, suggestions you may have in the comment section below. Thank you and have a wonderful day!
Saturday, February 4, 2012
Love's First Kiss

Love’s First Kiss
This tutorial was written by me for those who have a basic
Understanding and knowledge of PSP and it’s components.
Any similarities between this or any other tutorial are accidental
And purely coincidental.
Before we begin as always let’s gather our supplies.
What you will need:
A tube or tubes of choice. I am using the adorable art
Of Moshilove which can be found and purchased HERE
A Heart Shape Ding from a font, I’m using Sexy Love Hearts 2
Which I found free HERE
Mura Meister Copies
Everything else should be in PSP already
Now that we have gathered our supplies let’s begin.
1. Open your tube of choice in PSP
2. Open a new canvas 700 x 700 transparent background
3. Create a new raster layer
4. Go to your color pallet and set stroke to a color from your tube
And fill to null/transparent
5. Select your text tool, set to create as Vector, size 400, stroke width 10
I used the lower case letter “ Q “ q “
6. Go to objects, Allign, Center in canvas
7. Using the guide bars stretch the top and bottom of your heart
To fill in the canvas a little more, and recenter
8. Go to layers, Convert to Raster Layer
8. Now make your background layer active
9. Copy and paste your tube as a new layer
10. Resize your tube layer to about 60%
11. Now go to Effects, Mura Meister’s Copies
Using the following settings
 12. Select and make your heart layer active.
13. Using your Magic Wand tool select inside the heart fill area
14. Go to Selections, Modify, Expand by 4
15. Again to Selections, Invert Selection
16. Make you tube/copy layer active and click delete
This should leave you with a solid heart outline filled with a wallpaper
Of your tube image.
17. Selections, Select none
18. Still on your now cropped Wallpaper Layer go to Adjust, Colorize, and
Adjust the color so that it is shaded Red. This layer now acts as the filling for the heart.
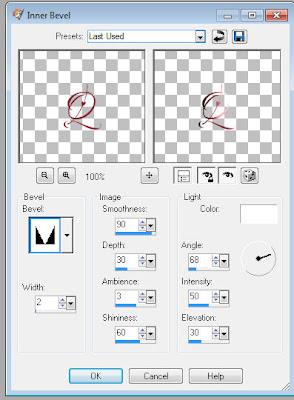
19. Make sure your heart layer is active again and go to Effects, 3D effects, now
Select an Inner Bevel that looks good to you.
I used the following settings for mine
 20. Close out your background layer then go to Layers, Merge, Merge Visible.
This tutorial was written by me for those who have a basic
Understanding and knowledge of PSP and it’s components.
Any similarities between this or any other tutorial are accidental
And purely coincidental.
Before we begin as always let’s gather our supplies.
What you will need:
A tube or tubes of choice. I am using the adorable art
Of Moshilove which can be found and purchased HERE
A Heart Shape Ding from a font, I’m using Sexy Love Hearts 2
Which I found free HERE
Mura Meister Copies
Everything else should be in PSP already
Now that we have gathered our supplies let’s begin.
1. Open your tube of choice in PSP
2. Open a new canvas 700 x 700 transparent background
3. Create a new raster layer
4. Go to your color pallet and set stroke to a color from your tube
And fill to null/transparent
5. Select your text tool, set to create as Vector, size 400, stroke width 10
I used the lower case letter “ Q “ q “
6. Go to objects, Allign, Center in canvas
7. Using the guide bars stretch the top and bottom of your heart
To fill in the canvas a little more, and recenter
8. Go to layers, Convert to Raster Layer
8. Now make your background layer active
9. Copy and paste your tube as a new layer
10. Resize your tube layer to about 60%
11. Now go to Effects, Mura Meister’s Copies
Using the following settings
 12. Select and make your heart layer active.
13. Using your Magic Wand tool select inside the heart fill area
14. Go to Selections, Modify, Expand by 4
15. Again to Selections, Invert Selection
16. Make you tube/copy layer active and click delete
This should leave you with a solid heart outline filled with a wallpaper
Of your tube image.
17. Selections, Select none
18. Still on your now cropped Wallpaper Layer go to Adjust, Colorize, and
Adjust the color so that it is shaded Red. This layer now acts as the filling for the heart.
19. Make sure your heart layer is active again and go to Effects, 3D effects, now
Select an Inner Bevel that looks good to you.
I used the following settings for mine
 20. Close out your background layer then go to Layers, Merge, Merge Visible.
21. Now Duplicate your merged layer, and move the copy under the original.
22. With your duplicate layer selected go to Effects, Distortion Effect, Twirl
Set to 360 degrees. Repeat this step twice more.
23. Reduce opacity on your twirled layer to about 45%
24. Again go to layers, merge, merge visible.
( You can now make your background layer visible again if you like.)
25. With your merged layer active go to Image, Resize, resize by 90%, and move toward the top of your canvas a little.
26. Once you are comfortable with the placement of your heart, copy and paste
Your tube as a new layer, and position where you want it.
27. Now add a drop shadow of your choice. I used
Vertical 3, Horizontal 3, Opacity 85, Blur 10, Color Black
28. Go to Image, Resize, 60%, make sure All Layers is checked.
( you may need to sharpen your image after this)
29. Add the Artist Copyright, your information, and Name
30. To save as a Jpeg go to Layers, Merge, Merge All/Flatten and save
For PNG or PSD format go to Layers, Merge, Merge Visible
And Viola! You are done!! Hope you enjoyed this fairly simplistic tutorial
Subscribe to:
Posts (Atom)
Grab My Blinkie

I CT For


My Fav Places


My Licenses


