E-Mag

Thursday, August 2, 2012
Tripped Devilish Bitch!
AS_TrippedDevilishBitch.png)
Tripped Devilish Bitch!
This tutorial was written by me. Any resemblance
or
similarity between this or any other
tutorial
is purely accidental and
coincidence.
To begin we will first need to gather our
supplies:
You will need a tube of choice, I am using the
inspired work of
Alpio Stanchi which can be found at Artistically
Inclined Licensing HERE
A scrap kit Devilish Bitch by Coyotie Designs
which can also be
purchased at AIL HERE
We will be using a few effects and plug ins to
include
Xenofex
Eye Candy 3
and Drop Shadow which comes standard with most
versions of PSP
Now that we have our supplies together we are
ready to begin.
1. Open a blank canvas 700 x 700 transparent
(please be sure pixels/inch is set to 72)
2. From the Devilish Bitch scrap kit open from
Elements cds_db_wire, then Copy
and paste as a new layer on your
canvas
3. Now from your Devilish Bitch pick a frame that
works well with your tube
I am using cds_db_frame2 and position where you
think works best
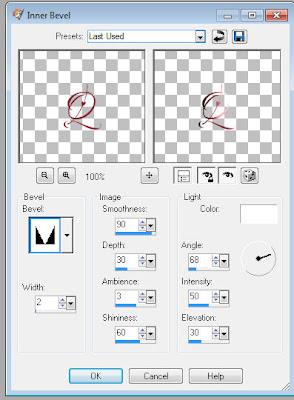
4. Go to effects, Eye Candy 3, Inner Bevel, now
use a bevel that you feel works best.
5. Copy and paste your tube as a new layer (you
may need to resize slightly)
6. Move your tube so that it sits well within or
over the frame.
7. Add a drop shadow of choice to your
tube
8. Now go to layers, Duplicate your tube
layer
9. Move your duplicate layer below your frame
layer
10. Making your original tube layer active use
you eraser brush to remove
any sections of the tube on the bottom of the
frame so that it appears the tube
is coming out of the frame.
11. Go back to your duplicate layer and still
using your eraser brush remove
any portions of the tube below the bottom line of
the frame.
12. Make your frame layer active, using your
magic wand feather zero, select inside
your frame.
13. Pick a paper from the Devilish Bitch kit
which matches or compliments
your tube then past as a new layer, move this
paper below your duplicate tube layer.
14. Go to selections, modify, expand by 3, then
invert selection and delete
15. No select none, and make invisible all but
your paper, duplicate tube, frame
and original tube layers
16. Go to Layers, Merge, Merge
Visible.
17. Make all layers visible once more and be sure
your Wire layer is active
18. Using your magic wand, tolerance 3, feather
15 select outside of your wire
19. Go to selections, modify, expand by
10
20, Selections, Invert
21. Now choose another paper from the Devilish
Bitch Kit, make your background layer
active, and add your paper as a new
layer.
22. Now press delete this should erase the area
outside of the wire on your paper, and
give a look of the paper fading toward the
outside.
23. Go to selections, Select none
24. Go to adjust, blur, radial blur set to twirl
with a strength of 45
25. At this point you can make your background
layer invisible
26. Go to Layers, Merge, Merge
Visible
27. You can make you background layer visible
again
28. With your merged layer active, go to Image,
Resize, (make sure
all layers is not selected), Resize by
85%
29. Now add a few elements as you
like
30. Merge everything together, go to Image,
Resize, All layers selected
resize to 420 x 420 pixels.
31. Go to Adjust, Sharpen
32. Now add Copyright Info and Name, save and
your done!
Hope you enjoyed this tutorial. Thank you for
taking the time to try.
Have a wonderful day!
Wednesday, July 11, 2012
Contemplating The Scene

Contemplating The Scene
This tut was written by me using PSP 9, but should be
able
to be replicated in any version. Any similarity betwixt
this
or any other tutorial is merely accidental and a matter of
coincidence.
Let's begin by gathering our supplies.
You will need obviously a tube and Font of Choice.
I am using the wonderful artwork of Andette!
which can be purchased at Artistically Inclined Licensing HERE
Word Art and Complimenting Mask.
I personally am using Word Art and a Mask that I created
specifically for this tag.
Eye Candy 3 Inner Bevel
All other plug ins are included with PSP
Now that we have our supplies we are ready to begin.
1. Open a blank canvas 650 x 650 background Transparent
2. Add new raster layer and flood fill white this is simply
to
provide a solid color background to work your canvas.
3. And new raster layer, go to selections, select all, back
to
selections, Modify, Contract by 100
4. Flood fill your selection with a color of choice. I would
recommend
choosing a color from your tube to avoid contrasting.
5. Go back to selections, modify, contract by 15, then click
delete
6. Go to selections select none
7. Go to effects, Texture Effects, Texture, Long Grain
Using the following settings:

8. Go to effects, Plug Ins, Eye Candy 3, Inner Bevel
use a bevel setting that feels right to you for a picture
frame.
9. Using your magic wand Tolerance 0, Feather 0
select the inside of your frame.
10. Go to selections, modify, expand, expand by 3
11. Create a new raster layer, and move this layer below your
frame
12. Now pick another color of choice, from your tube or if
you
wish contrasting, and flood fill.
13. Go to selections, select none
14. Create New Raster layer, and create your word art inside
your frame, or
if you are using ready made word art place it now, resize and
position
within your frame.
15. Once you have your word art positioned comfortably within
your frame
go to layers, merge, merge down.
16. Go to effects, Texture Effects, Texture, Canvas
Simple
using the same settings as before
17. Go to your layer pallet and select your frame layer, then
go to layers, merge, merge down
18. Make your color background layer active, and create new
raster layer.
19. Flood fill this layer with a color of your choosing
20. This is where you add your mask layer. If you are using an
installed mask
go to layers, load save mask, if you are using a .jpeg mask
that
you have open in PSP go to layers, new mask layer, create from
image.
21. Making sure that your top layer is active, Paste your tube
as a new layer.
Resize and position as you desire.
22. Once you have your tube positioned to use for reference
make your picture layer
active, go to image, resize (make sure "all layers" is NOT
selected, then
resize as best suits your tube and desired positioning.
23. Go to Image, rotate, free rotate, depending on which side
you placed your tube on
rotate either to left or right by 15 degrees, again making
sure that "all layers" is NOT selected.
24. Now go to image, resize, resize to 420 x 420 pixels.
25. Add your artist copyright and other required
information
26. Add the name on your tag, merge to save how you prefer
either Jpeg or PNG, and we are finished!
I hope you enjoyed this tutorial, and wish you all a wonderful
day.
On A Side note. If you noticed, the word art created for this
tutorial is about
Childhood Cancer. My son was diagnosed September 29, 2009 with
DIPG.
So of course Childhood Cancer awareness means a lot to me. So
please
learn what you can, educate others, and above all Be
Aware.
Wednesday, March 28, 2012
Easy Easter
 Easy Easter
This tutorial is written by me with the express
purpose of being nothing more than a road map
for those with a basic working knowledge
of PSP. Any similarity between this and
any other tutorial is nothing more than coincidence.
Today's tutorial will perhaps be one of the easiest
one's you will ever follow. This is simply about
playing with tools available in PSP as it comes.
So with that in mind here is what will be needed to
complete this tutorial:
1) A tube of choice, obviously I know. I am using
the wonderful work of Daria Andraczko!
which can be found HERE at Artistically Inclined Licensing
yes you do need a license to use her work, and yes
it is worth it to check out the other artist you can find there.
2) PSP yep that's right everything we will be using comes standard
with your PSP program
3) An imagination, and the ability to have fun with your creativity
Now, in hopes that we all have our needed supplies gathered
we are ready to begin.
1. Create a new canvas 700 x 700
I start with a transparent background, but you may fill in
any color that you like if you so desire.
2. Create a new raster layer
3. Select your "Picture Tube Tool" please see image below
for reference if you do not know where to find this.

4. Create a background by playing around with the objects
in the picture tube selection area. I find it easier to manipulate
the scene and selections if I create a new raster layer for
each item I choose to add. Don't forget to adjust size and step
to assist in finding a layout that you enjoy. I used Lawn, and Nostalgia
for my background, then added a few little items here and there to
create a festive scene. These can be found by using add-ons to
your picture tube folder, or just grabbing items from a scrap kit you like.
5. After you have the background you are satisfied with
make your original raster (background layer) invisible then go to layers,
merge, merge visible.
6. Make your background layer visible once more and place your
tube as a new layer. Position as desired then merge down.
7. Resize as desired. I usually resize to around 420 x 420 or 60%
8. Now add artist copyright, name, and any word art
you may have decided to use.
Congratulations You're done. I realize the exercise of this
tutorial may seem simplistic in nature, but I decided on this course
due to the fact that I feel there are times we neglect some of the
more basic tools available to us. I hope you enjoyed playing around
with this, and have a wonderful day!
Sunday, February 19, 2012
Under The Ocean Blue

Under The Ocean Blue
This tutorial was written for use by those with a basic
understanding of PSP. Any similarity or resemblance to
Another tutorial is purely coincidental and accidental.
To begin we will first need to gather our supplies.
1) A tube of Choice. I will be using the swimmingly beautiful work
Of Creepie Cuties which can be found HERE
@ Artistically Inclined Licensing
2) Bella Mermaid Scrap kit by Lizquis Scraps
Which can be found HERE
3) Obviously a font of choice
4) All effects used come standard with PSP
Now that we have gathered our fairly simplistic list of
Supplies we are ready to begin.
1. Open a new canvas 700 x 700 transparent.
2. Go to your color pallet, make the stroke Black, and the fill color null
3. Using your preset shapes, elipse, create a circle a little
less than the size of your canvas. Line width 10 with
anti alias, and create as vector checked
4. Once you have your circle the desired size go
to Objects, Allign, Center in canvas
5. Now convert the vector to a raster layer.
7. Using your magic wand click on the inside of your circle
8. Go to selections, Modify, Expand by 5
9. From the Bella Mermaid Scrap kit open paper 6 or as it
Reads in the file papel6, copy and paste as new layer, move the paper
below your circle layer
10. Go to Selections, Invert Selection, then click delete.
11. Go to Selections, Select None
12. Copy and paste your tube as a new layer. Position as desired beneath
The circle layer, but remain above the paper layer.
13. Duplicate your tube layer and move to original above your circle layer.
14. Make your original tube invisible then make the duplicate active.
15. Using your erasure tool, remove a few pieces of the tube on one side
That stick out past the circle.
16. Make the original tube layer active and visible once again.
17. Now using the erasure tool again, on the same sections of the tube you removed before, remove from your original tube. This should give the effect of your tube coming out of the frame or window behind it.
18. Now we make the background layer invisible, go
to layers, merge, merge visible.
19. Duplicate your image layer and move the original above the copy
20. On your original go to Image, Resize, Resize to 80%
21. Make your duplicate layer active and reduce opacity to 40%
22. Go to Effects, Texture Effects, Blinds
With the following settings:
 23. Again go to Effects, Texture Effects, Blinds
Same settings but uncheck Horizontal so settings look like the following:
 24. Again make sure your background layer is still invisible
Then go to layers, merge, merge visible
25. Reposition your image as you like, and add elements from the scrap
kit. Be sure to use what matches the tube you’ve chosen, and place
Where you think it looks best.
26. Resize by either 60% or if using by pixel resizing
Resize to 420 x 420
27. Add any word art or phrase you want, Artist Copyright info, and name
28. Make your background layer visible, and if saving as a .png then go to layers, merge, merge visible. If you wish to save as a .jpeg you can either go to layers, merge, merge all (flatten), this will automatically make your background white, or you may make your background layer a color of your choosing then go to layers, merge, merge all
I hope you enjoyed this tutorial. Feel free to share any comments, suggestions you may have in the comment section below. Thank you and have a wonderful day!
Saturday, February 4, 2012
Love's First Kiss

Love’s First Kiss
This tutorial was written by me for those who have a basic
Understanding and knowledge of PSP and it’s components.
Any similarities between this or any other tutorial are accidental
And purely coincidental.
Before we begin as always let’s gather our supplies.
What you will need:
A tube or tubes of choice. I am using the adorable art
Of Moshilove which can be found and purchased HERE
A Heart Shape Ding from a font, I’m using Sexy Love Hearts 2
Which I found free HERE
Mura Meister Copies
Everything else should be in PSP already
Now that we have gathered our supplies let’s begin.
1. Open your tube of choice in PSP
2. Open a new canvas 700 x 700 transparent background
3. Create a new raster layer
4. Go to your color pallet and set stroke to a color from your tube
And fill to null/transparent
5. Select your text tool, set to create as Vector, size 400, stroke width 10
I used the lower case letter “ Q “ q “
6. Go to objects, Allign, Center in canvas
7. Using the guide bars stretch the top and bottom of your heart
To fill in the canvas a little more, and recenter
8. Go to layers, Convert to Raster Layer
8. Now make your background layer active
9. Copy and paste your tube as a new layer
10. Resize your tube layer to about 60%
11. Now go to Effects, Mura Meister’s Copies
Using the following settings
 12. Select and make your heart layer active.
13. Using your Magic Wand tool select inside the heart fill area
14. Go to Selections, Modify, Expand by 4
15. Again to Selections, Invert Selection
16. Make you tube/copy layer active and click delete
This should leave you with a solid heart outline filled with a wallpaper
Of your tube image.
17. Selections, Select none
18. Still on your now cropped Wallpaper Layer go to Adjust, Colorize, and
Adjust the color so that it is shaded Red. This layer now acts as the filling for the heart.
19. Make sure your heart layer is active again and go to Effects, 3D effects, now
Select an Inner Bevel that looks good to you.
I used the following settings for mine
 20. Close out your background layer then go to Layers, Merge, Merge Visible.
21. Now Duplicate your merged layer, and move the copy under the original.
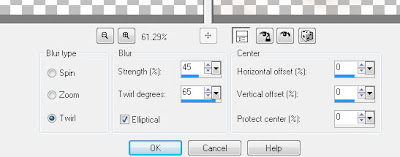
22. With your duplicate layer selected go to Effects, Distortion Effect, Twirl
Set to 360 degrees. Repeat this step twice more.
23. Reduce opacity on your twirled layer to about 45%
24. Again go to layers, merge, merge visible.
( You can now make your background layer visible again if you like.)
25. With your merged layer active go to Image, Resize, resize by 90%, and move toward the top of your canvas a little.
26. Once you are comfortable with the placement of your heart, copy and paste
Your tube as a new layer, and position where you want it.
27. Now add a drop shadow of your choice. I used
Vertical 3, Horizontal 3, Opacity 85, Blur 10, Color Black
28. Go to Image, Resize, 60%, make sure All Layers is checked.
( you may need to sharpen your image after this)
29. Add the Artist Copyright, your information, and Name
30. To save as a Jpeg go to Layers, Merge, Merge All/Flatten and save
For PNG or PSD format go to Layers, Merge, Merge Visible
And Viola! You are done!! Hope you enjoyed this fairly simplistic tutorial
Thursday, January 5, 2012
Innocent Valentine

Innocent Valentine
This tutorial was written by me for those who
Have a basic working knowledge of PSP. I am using
PSP 9, but you can use any version you like.
Any resemblance or similarity between this or any other
Tutorial is purely coincidental and accidental.
First let’s gather our materials.
You will need a tube or tubes of choice.
I am using the wonderful artwork of
Tatyana Haustova which can be be HERE
You must have a license to use this work.
If you decide to use more than one tube please follow all artist TOU’s
We will be making a frame ourselves so that will be under
Your preset shapes.
We will need 2 background patterns and a mask of choice.
I am using Heart Mask by Vicky from Creative Misfits Designs which can be found HERE
Plug-ins needed are Eye Candy 3 Inner Bevel and the rest
Come standard with PSP.
Now that we have our supplies let’s begin.
1. Start by opening your chosen tube in PSP
2. Open a New Canvas 750 width x 350 height
Color null Minimize this for later use.
3. Open another New Canvas 250 x 250 color null
4. On your color pallet make your fill color Null, and your stroke color a medium or dark color from your tube, line width 10.
5. On the smaller canvas we created using your preset shapes, elipse
Make a circle nearly edge to edge on all sides, center in canvas.
6. Go to layers, Convert to raster Layer.
7. Now the fun stuff, go to your plug-ins and select Eye Candy 3: Inner Bevel with the following settings:
 8. Now Copy your ring frame and paste as a new layer on the larger canvas.
9. Go to Layers, duplicate. Do this three times so that you have four rings.
10. Arrange these rings across your canvas from the left edge to right edge
Just below the top edge of your canvas. Allowing just a little overlap from ring to ring.
11.Once you have the rings set the way you want them copy and paste your tube as a new layer.
12. Move your tube below the ring layer, now duplicate your tube
So that you have four copies, one for each ring.
13. Position the tube and copies below each ring as you see fit.
The following steps will be repeated on each ring and it’s corresponding tube layer.
14. On your ring layer using your magic wand, click inside the ring.
15. Got to selections, Modify, Expand Selection by 5
16. Under the tube layer create new raster layer, now flood fill with
A color or pattern of choice. I am using black
16. Now back to selections, Invert Selection
17. On your tube layer click delete.
18. Choose Selections, Select none
19. Reduce the opacity of you tube layer to about 15%
20. On the ring layer add a drop shadow of choice. I am using
H-3, V-3, Opacity 40, blur 8, color light to med pink/purple
This will leave you with a framed portion of your tube inside each ring.
21. Close out your background layer, then go to layers, merge, merge visible.
22. On your merged layer go to Image, Resize, make sure all layers is NOT checked resize by 85% then Position closer to the top edge of your canvas leaving a little room above
23. Select your back ground layer and create new raster layer
24. Go to selections, select all, then flood fill with a darker color from your tube.
25. Back to selections, select none
26. Now we go to layers, and depending on if you saved you mask to the mask folder or not you will either go to Load Save Mask and load Mask from Disk, or if you did not save it to the Mask folder then open the mask in PSP and select create New Mask Layer from image.
27. Go to layers, merge, merge group.
Depending on the tube you have chosen to work with you may be able to make some adjustments to the next few steps. The tube I am using has a solid edge to it so I will be framing the edges to keep it from looking chopped off. If you wish to frame out your entire image go to the next step, or if you want to create as a floating PNG image skip to step 33.
28. Make your top layer active then create new raster layer.
29. Go to selections, select all, and then flood fill with a color of your choice. I am using the same color I used for my mask layer.
30. Go to selections, Modify, Contract by 10 then click delete. This will leave a frame around the outside of your image.
31. Go to Effects, Eye Candy 3 and use the same inner bevel you used on your ring frames.
32. Select your background layer and flood fill with a light color of choice. I’m using white.
33. Copy and paste your tube as a new layer. Resize and position as desired.
If you did the framed version make sure your tube layer is under the frame layer.
34. Add Drop shadow of choice. I am using H-3, V-3, Opacity 85, Blur 3, Color Black
35. Now how you merge and save depends on if you did the framed version or if you did the unframed version with the intention of saving as a PNG.
For the framed version go to Layers, Merge, Merge All Flatten.
For the PNG Version go to Layers, Merge, Merge Visible.
36. Add the artist copyright and credit information per Artist TOU’s
37. At this point you are ready to save as a blank tag, or just go ahead and add your name using a font that you feel matches the concept of the tag and your tube. Don’t forget to merge again using the same type of merge you did previously before you save and you are finished!
I hope you found this tutorial enjoyable and easy to follow.
Please feel free to share your results by emailing to KelticShadow@aol.com
Friday, December 9, 2011
Guardian Spirit
 This tutorial is written by me for those
who have a basic knowledge of PSP. Any similarity to
another tutorial is completely coincidental and accidental.
To begin we will need the following supplies:
1. A tube of choice preferably with a close up layer included
I am using the ass kicking artwork
of Freya Langford-Sidebottom which can be purchased HERE
2. a background image or gradient of choice
I am using the background layer of my chosen tube
3. Two masks of choice I am using WSL_Mask126 and WSL_Mask133
by weescotslass creations which can both be found HERE
you can find the download link on the right side of the page
4. And of course you need a font of choice
There is no need to search for filters or plug ins as
those used are all found in PSP
Now that we have gathered our supplies let's rock this thing!
1. Open a blank canvas 700 x 700 transparent
2. Create new raster layer
3. Go to selections, select all
4. Paste your image "into selection"
or flood fill with your chosen gradient
5. Selections, select none
6. Go to Layers, if you saved your mask to PSP
files go to Load/Save Mask, Load Mask from Disk
and select your chosen mask. If you did not save the mask
to your files then you'll need to open it as
an image in PSP, go to layers, create new mask layer, create
from image.
7. Go to layers, merge, merge group
8. Duplicate you mask layer
9. Make sure Copy layer is selected and go
to Adjust, Blur, Radial Blur
with the following settings:
10. Go to Layers, Merge, Merge Down
11. Copy and paste your tube as a new layer resize
and position as desired
12. Add drop shadow of choice. I used V3, H3, Opacity 85, Blur 5
13. Copy and paste your close up layer as a new layer, now
on your layer pallet drag this below your tube layer and position
as you see fit
14. Add your second mask to the close up layer
15. Go to layers, merge, merge group
16. Reduce the opacity of this layer to about 35%
17. On your layer pallet close out your background layer or if
you intend to save as a PNG instead of JPEG then just delete layer
18. Go to layers, merge, merge visible
19. Now go to Image, Resize, make sure "All Layers" is
NOT checked and resize to 80%
20. Back to Image, Resize, "All Layers" checked, resize to 400 x 400
21. Add artist copyright info, your watermark, and name.
22. If saving as a PNG go to layers, merge, merge visible.
If saving as a JPEG make sure your background layer
is visible, and merge, merge all flatten
23. Share you finished tag, and enjoy!
I truly hope you enjoyed this tutorial. Below shows my results
using a gradient instead of an image.
Subscribe to:
Posts (Atom)
Grab My Blinkie

I CT For


My Fav Places


My Licenses


