E-Mag

Sunday, September 21, 2008
~Spiral Love~
~Spiral Love~
This tutorial was written by me on 09-17-2008, and any similarities
to others are merely coincidental.
This tutorial was written using Corel PSP X and Jasc Animation Shop 3
To complete this tutorial you will need one tube of choice,
I am using the awesome artwork of Mark Yanko
which you can purchase here Creative Image Licensing and Management ,
or direct to his page here Mark Yanko Images and Tubes ,
one preset shape or tubed accent of choice,
one paper or pattern of choice, one mask of choice,
font of choice, and Mura Meister Copies plug in.
Now that you have chosen your tube or tubes
and preset shapes or accents we are ready to begin.
1. Open new canvas 600 x 600 fill with pattern or paper of choice
2. Create new raster layer and fill with color that compliments tube
3. Add mask layer ( may need to invert mask, once happy with Mask merge group )
4. Add tube of choice and position as desired
(yes this can include moving beneath your mask layer if you left that possibility open by inverting your mask )
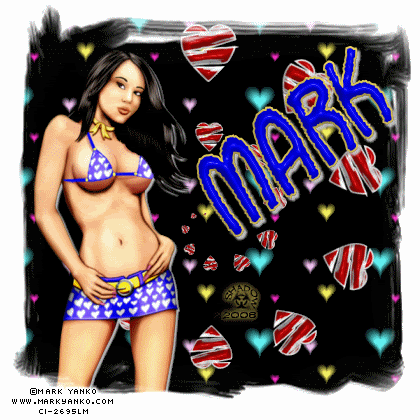
By now you should have something that looks like this...
to others are merely coincidental.
This tutorial was written using Corel PSP X and Jasc Animation Shop 3
To complete this tutorial you will need one tube of choice,
I am using the awesome artwork of Mark Yanko
which you can purchase here Creative Image Licensing and Management ,
or direct to his page here Mark Yanko Images and Tubes ,
one preset shape or tubed accent of choice,
one paper or pattern of choice, one mask of choice,
font of choice, and Mura Meister Copies plug in.
Now that you have chosen your tube or tubes
and preset shapes or accents we are ready to begin.
1. Open new canvas 600 x 600 fill with pattern or paper of choice
2. Create new raster layer and fill with color that compliments tube
3. Add mask layer ( may need to invert mask, once happy with Mask merge group )
4. Add tube of choice and position as desired
(yes this can include moving beneath your mask layer if you left that possibility open by inverting your mask )
By now you should have something that looks like this...
5. Create new raster layer and place preset shape, go to objects, align, center in canvas now
go to layers merge down
( if using an accent instead of a preset shape just paste as new layer )
6. Move your shape or accent layer beneath your tube layer
7. Go to Effects, Plug ins Mura Meister Copies, Spiral
( we will call this layer spiral )
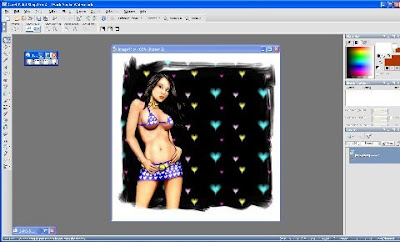
You should now have something that looks like this
go to layers merge down
( if using an accent instead of a preset shape just paste as new layer )
6. Move your shape or accent layer beneath your tube layer
7. Go to Effects, Plug ins Mura Meister Copies, Spiral
( we will call this layer spiral )
You should now have something that looks like this
8. Duplicate your Spiral Layer and go to Image Rotate, Free Rotate, Right 15
( be certain that the all layers box is not checked )
( this layer will be Spiral 2 )
9. Duplicate This layer and repeat rotate
( this layer will be Spiral 3 )
10. Resize all layers.. I use 70 % as this will give a finished size of 420 x 420
11. It is now time to add artist © and your license number if using a licensed artist
as well as your watermark if you choose to do so
12. Add new raster layer above all other layers and add name
13. Open Animation Shop
14. Make Spiral 2 and 3 invisible
15. Copy Merged then go over to Animation Shop and paste as new Animation
16. Go back to PSP Close out ( make invisible) Spiral and make visible Spiral 2
17. Again Copy Merged and go back to Animation Shop this time right click on the previous
image and select paste after current frame
18. Back to PSP close out Spiral 2 and make visible Spiral 3
19. Once More Copy merged and back to Animation Shop paste after current frame
20. You may want to play with frame properties to achieve the speed and effect you desire
( I used 15 for this one ) otherwise just save as .gif and you're done!!!
Subscribe to:
Post Comments (Atom)
Grab My Blinkie

I CT For


My Fav Places


My Licenses


1 comments:
hello this is channi (channi D's Freebie scraps)
you asked for permission to use one of my kits for a tut and i think you were having problems downloading it cause it was in a rar format i can do it in a zip if you would like you can email me at
angelbugg101@gmail.com
it is okay that you do all i ask is that you link it back to my site hun!!!!
Thank you
Channi