E-Mag

Monday, September 22, 2008
~Dayglow Roller~

Dayglow Roller
This tutorial was written by me on 9-21-2008
Any similarities to another tutorial is purely coincidence and unintentional.
Materials needed are:
Dayglow Dayz Scrap Kit by Scraps by Storm
this is a Pay To Use kit which can be purchased HERE
One tube of choice, I'm using the Awesome Artwork of Ted Hammond
which is Pay To Use and can be purchased HERE
Eye Candy 3 Inner Bevel
Once we have selected our tube and prepared
the Sbs_Dayglow Dayz Kit we're ready to begin
1. Open new canvas 600 x 600 transparent
2. Open the sbs_DD square glitter frame of your choice
now copy and paste as new layer
3. Using your magic wand tolerance 10, feather 0, click inside your frame
go to selections, modify, expand by 10
5. Open one of the sbs_DD papers of choice I used Striped Paper1
copy and paste as new layer and move beneath your frame.
Now go to selections, Invert, and hit delete. Select None
6. Back to your Square frame layer using your magic wand same settings as before
once again click inside your frame.
7. Create new raster layer then open one of the sbs_DD Star frames
copy and paste into selection. Selections, select none.
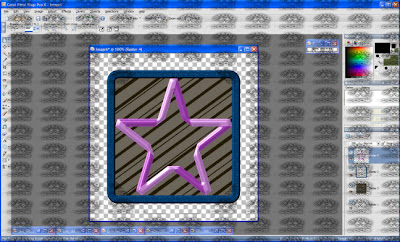
7. Go to effects, Eye Candy 3 Inner bevel
Bevel width 12, Bevel Shape Rounded, Smoothness 9, Shadow depth 10
Brightness 90, Sharpness 40, Direction 134, Inclination 67
By now you should have something that looks like this
Any similarities to another tutorial is purely coincidence and unintentional.
Materials needed are:
Dayglow Dayz Scrap Kit by Scraps by Storm
this is a Pay To Use kit which can be purchased HERE
One tube of choice, I'm using the Awesome Artwork of Ted Hammond
which is Pay To Use and can be purchased HERE
Eye Candy 3 Inner Bevel
Once we have selected our tube and prepared
the Sbs_Dayglow Dayz Kit we're ready to begin
1. Open new canvas 600 x 600 transparent
2. Open the sbs_DD square glitter frame of your choice
now copy and paste as new layer
3. Using your magic wand tolerance 10, feather 0, click inside your frame
go to selections, modify, expand by 10
5. Open one of the sbs_DD papers of choice I used Striped Paper1
copy and paste as new layer and move beneath your frame.
Now go to selections, Invert, and hit delete. Select None
6. Back to your Square frame layer using your magic wand same settings as before
once again click inside your frame.
7. Create new raster layer then open one of the sbs_DD Star frames
copy and paste into selection. Selections, select none.
7. Go to effects, Eye Candy 3 Inner bevel
Bevel width 12, Bevel Shape Rounded, Smoothness 9, Shadow depth 10
Brightness 90, Sharpness 40, Direction 134, Inclination 67
By now you should have something that looks like this
8. Using your magic wand, again same settings as before, click
inside your star frame. Go selections, modify, expand by 10, selections, invert.
9. Open another of the sbs_DD papers and paste as new layer
move the paper beneath your star frame, delete. Selections, select none.
10. Back to your star frame, add a drop shadow as you see fit.
I used V & H 3 Blur 3, and Color Black
11. Now add your tube as new layer, resize and position as desired.
Add drop shadow same settings as used on star frame.
12. Depending on the tube you chose you may want to add a few additional
elements from the Dayglow Dayz kit to compliment this is of course
completely optional. I added a knotted ribbon to mine.
13. Merge all flatten, resize as desired. Add Artist information, watermark and name.
Congratulations you've completed your tag!
Subscribe to:
Post Comments (Atom)
Grab My Blinkie

I CT For


My Fav Places


My Licenses


0 comments: