E-Mag

Friday, December 9, 2011
Guardian Spirit
 This tutorial is written by me for those
who have a basic knowledge of PSP. Any similarity to
another tutorial is completely coincidental and accidental.
To begin we will need the following supplies:
1. A tube of choice preferably with a close up layer included
I am using the ass kicking artwork
of Freya Langford-Sidebottom which can be purchased HERE
2. a background image or gradient of choice
I am using the background layer of my chosen tube
3. Two masks of choice I am using WSL_Mask126 and WSL_Mask133
by weescotslass creations which can both be found HERE
you can find the download link on the right side of the page
4. And of course you need a font of choice
There is no need to search for filters or plug ins as
those used are all found in PSP
Now that we have gathered our supplies let's rock this thing!
1. Open a blank canvas 700 x 700 transparent
2. Create new raster layer
3. Go to selections, select all
4. Paste your image "into selection"
or flood fill with your chosen gradient
5. Selections, select none
6. Go to Layers, if you saved your mask to PSP
files go to Load/Save Mask, Load Mask from Disk
and select your chosen mask. If you did not save the mask
to your files then you'll need to open it as
an image in PSP, go to layers, create new mask layer, create
from image.
7. Go to layers, merge, merge group
8. Duplicate you mask layer
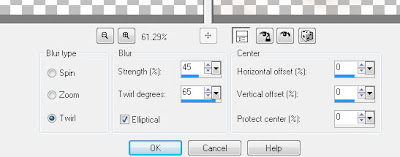
9. Make sure Copy layer is selected and go
to Adjust, Blur, Radial Blur
with the following settings:
10. Go to Layers, Merge, Merge Down
11. Copy and paste your tube as a new layer resize
and position as desired
12. Add drop shadow of choice. I used V3, H3, Opacity 85, Blur 5
13. Copy and paste your close up layer as a new layer, now
on your layer pallet drag this below your tube layer and position
as you see fit
14. Add your second mask to the close up layer
15. Go to layers, merge, merge group
16. Reduce the opacity of this layer to about 35%
17. On your layer pallet close out your background layer or if
you intend to save as a PNG instead of JPEG then just delete layer
18. Go to layers, merge, merge visible
19. Now go to Image, Resize, make sure "All Layers" is
NOT checked and resize to 80%
20. Back to Image, Resize, "All Layers" checked, resize to 400 x 400
21. Add artist copyright info, your watermark, and name.
22. If saving as a PNG go to layers, merge, merge visible.
If saving as a JPEG make sure your background layer
is visible, and merge, merge all flatten
23. Share you finished tag, and enjoy!
I truly hope you enjoyed this tutorial. Below shows my results
using a gradient instead of an image.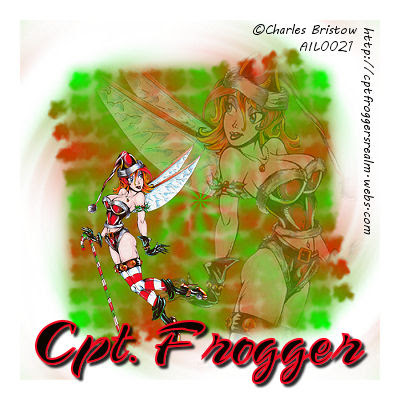
There is no need to search for filters or plug ins as
those used are all found in PSP
Now that we have gathered our supplies let's rock this thing!
1. Open a blank canvas 700 x 700 transparent
2. Create new raster layer
3. Go to selections, select all
4. Paste your image "into selection"
or flood fill with your chosen gradient
5. Selections, select none
6. Go to Layers, if you saved your mask to PSP
files go to Load/Save Mask, Load Mask from Disk
and select your chosen mask. If you did not save the mask
to your files then you'll need to open it as
an image in PSP, go to layers, create new mask layer, create
from image.
7. Go to layers, merge, merge group
8. Duplicate you mask layer
9. Make sure Copy layer is selected and go
to Adjust, Blur, Radial Blur
with the following settings:
10. Go to Layers, Merge, Merge Down
11. Copy and paste your tube as a new layer resize
and position as desired
12. Add drop shadow of choice. I used V3, H3, Opacity 85, Blur 5
13. Copy and paste your close up layer as a new layer, now
on your layer pallet drag this below your tube layer and position
as you see fit
14. Add your second mask to the close up layer
15. Go to layers, merge, merge group
16. Reduce the opacity of this layer to about 35%
17. On your layer pallet close out your background layer or if
you intend to save as a PNG instead of JPEG then just delete layer
18. Go to layers, merge, merge visible
19. Now go to Image, Resize, make sure "All Layers" is
NOT checked and resize to 80%
20. Back to Image, Resize, "All Layers" checked, resize to 400 x 400
21. Add artist copyright info, your watermark, and name.
22. If saving as a PNG go to layers, merge, merge visible.
If saving as a JPEG make sure your background layer
is visible, and merge, merge all flatten
23. Share you finished tag, and enjoy!
I truly hope you enjoyed this tutorial. Below shows my results
using a gradient instead of an image.
Subscribe to:
Post Comments (Atom)
Grab My Blinkie

I CT For


My Fav Places


My Licenses


0 comments: