E-Mag

Monday, November 24, 2008
~Winter Wonderland~
Winter_Wonderland.jpg)
~Winter Wonderland~
This tutorial was written by me on 11-24-2008, and
is intended for those who has a basic knowledge
of PSP. Any resemblance to another tutorial is strictly
coincidental and unintentional.
To complete this tutorial you will need the following:
1 Mask I am using Vix_ChristmasMask5 which can be found HERE
3 photos of your choice
I am using scenery pictures of Winter in Yosemite
taken by a personal friend and her husband.
To find a large variety of scenic photos check HERE
All effects come standard with PSP
Now that we have our supplies gathered we are ready to get started!
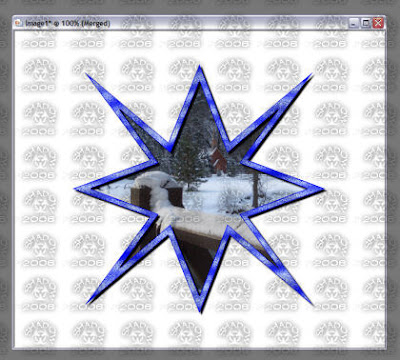
1. Open a new canvas 700 x 600 fill white
2. Create new raster layer
3. Go to preset Shapes You can use any shape you like
I used star 7 line width 7 foreground and stroke any color you choose
I used 080bf2 and fill color null create as vector size and position
as desired, then go to layers, merge, merge down
4. Using you magic wand tool click inside your frame.
5. Go to selections, modify, expand by 4
Selections invert
6. Open one of the images you picked now copy and paste as new layer.
Move beneath your frame layer and press delete
( you may have to resize and position your image for desired portion to be seen )
Selections, select none.
7. Using your magic wand on your frame layer select your frame.
Go to selections, modify, contract by 2
8. Using the airbrush tool with the following settings:
size: 30, hardness: 10, step: 27, density: 45, thickness: 100, opacity: 50, blend mode: Overlay
using a lighter color than your frame put random lines over the frame
to look like dust or snow I used c1e5e5
9. Go to Selections, Select none.Now go to layers
Merge, Merge down and add a drop shadow of choice to your frame.
10. Make your
white background invisible, then merge, merge visible.
you can reopen your white layer now.
you should now have something like this:
To find a large variety of scenic photos check HERE
All effects come standard with PSP
Now that we have our supplies gathered we are ready to get started!
1. Open a new canvas 700 x 600 fill white
2. Create new raster layer
3. Go to preset Shapes You can use any shape you like
I used star 7 line width 7 foreground and stroke any color you choose
I used 080bf2 and fill color null create as vector size and position
as desired, then go to layers, merge, merge down
4. Using you magic wand tool click inside your frame.
5. Go to selections, modify, expand by 4
Selections invert
6. Open one of the images you picked now copy and paste as new layer.
Move beneath your frame layer and press delete
( you may have to resize and position your image for desired portion to be seen )
Selections, select none.
7. Using your magic wand on your frame layer select your frame.
Go to selections, modify, contract by 2
8. Using the airbrush tool with the following settings:
size: 30, hardness: 10, step: 27, density: 45, thickness: 100, opacity: 50, blend mode: Overlay
using a lighter color than your frame put random lines over the frame
to look like dust or snow I used c1e5e5
9. Go to Selections, Select none.Now go to layers
Merge, Merge down and add a drop shadow of choice to your frame.
10. Make your
white background invisible, then merge, merge visible.
you can reopen your white layer now.
you should now have something like this:
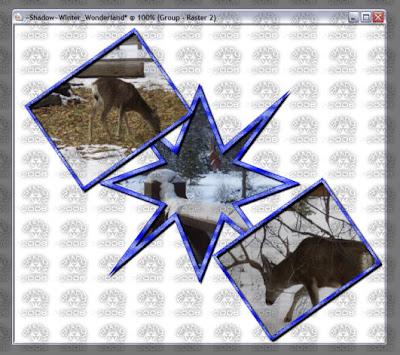
10. Again to your preset shapes tool. This time using a rectangle
or square with a foreground and stroke of 5 fill null. Same colors as used for first frame
again create as vector. rotate and position toward the top left corner of the original
frame try to avoid covering the first image if possible.
then convert to raster layer.
11. Repeat steps 4 through 9 for your new frame.
then close out your background and original frame layers go to layers,
merge, merge visible.
Now reopen your other layers again.
12. Repeat steps 10 and 11 for a third and final frame, but
move this one to the lower right corner of your original frame.
Now you should be here:
13. Select your background layer, then create new raster layer.
14. Using your fill tool flood fill this layer with a color that compliments
your images and the mask you have chosen to use.
I filled with 8dbbf2
15. Go to layers, Load/save mask, Load mask from disk
go to layers, merge, merge group
( if you chose to use the Vix_ChristmasMask5 as I did you may need to
reposition in order to see the wording. )
16. Now go to layers, merge, merge all.
17. Resize by 70%
18. Add your name, artist information, and your personal watermark if you use one.
You're done!!!
Thank you for attempting this tutorial.
I hope you enjoyed it.
Subscribe to:
Post Comments (Atom)
Grab My Blinkie

I CT For


My Fav Places


My Licenses


0 comments: