Links of Interest
Followers
Blog Archive
Saturday, February 4, 2012
Love's First Kiss
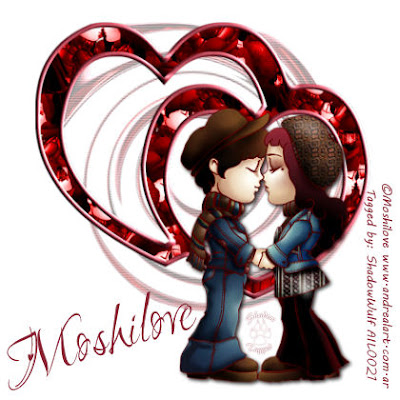
Love’s First Kiss
This tutorial was written by me for those who have a basic
Understanding and knowledge of PSP and it’s components.
Any similarities between this or any other tutorial are accidental
And purely coincidental.
Before we begin as always let’s gather our supplies.
What you will need:
A tube or tubes of choice. I am using the adorable art
Of Moshilove which can be found and purchased HERE
A Heart Shape Ding from a font, I’m using Sexy Love Hearts 2
Which I found free HERE
Mura Meister Copies
Everything else should be in PSP already
Now that we have gathered our supplies let’s begin.
1. Open your tube of choice in PSP
2. Open a new canvas 700 x 700 transparent background
3. Create a new raster layer
4. Go to your color pallet and set stroke to a color from your tube
And fill to null/transparent
5. Select your text tool, set to create as Vector, size 400, stroke width 10
I used the lower case letter “ Q “ q “
6. Go to objects, Allign, Center in canvas
7. Using the guide bars stretch the top and bottom of your heart
To fill in the canvas a little more, and recenter
8. Go to layers, Convert to Raster Layer
8. Now make your background layer active
9. Copy and paste your tube as a new layer
10. Resize your tube layer to about 60%
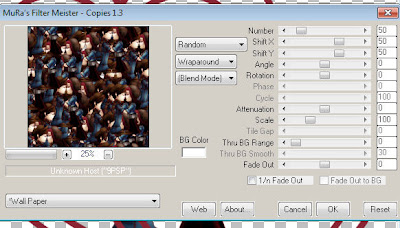
11. Now go to Effects, Mura Meister’s Copies
Using the following settings
 12. Select and make your heart layer active.
13. Using your Magic Wand tool select inside the heart fill area
14. Go to Selections, Modify, Expand by 4
15. Again to Selections, Invert Selection
16. Make you tube/copy layer active and click delete
This should leave you with a solid heart outline filled with a wallpaper
Of your tube image.
17. Selections, Select none
18. Still on your now cropped Wallpaper Layer go to Adjust, Colorize, and
Adjust the color so that it is shaded Red. This layer now acts as the filling for the heart.
19. Make sure your heart layer is active again and go to Effects, 3D effects, now
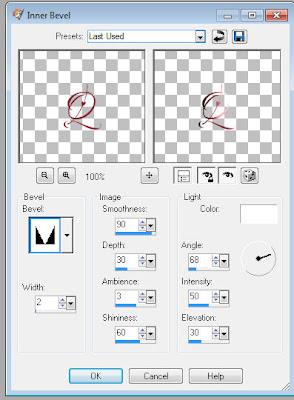
Select an Inner Bevel that looks good to you.
I used the following settings for mine
 20. Close out your background layer then go to Layers, Merge, Merge Visible.
This tutorial was written by me for those who have a basic
Understanding and knowledge of PSP and it’s components.
Any similarities between this or any other tutorial are accidental
And purely coincidental.
Before we begin as always let’s gather our supplies.
What you will need:
A tube or tubes of choice. I am using the adorable art
Of Moshilove which can be found and purchased HERE
A Heart Shape Ding from a font, I’m using Sexy Love Hearts 2
Which I found free HERE
Mura Meister Copies
Everything else should be in PSP already
Now that we have gathered our supplies let’s begin.
1. Open your tube of choice in PSP
2. Open a new canvas 700 x 700 transparent background
3. Create a new raster layer
4. Go to your color pallet and set stroke to a color from your tube
And fill to null/transparent
5. Select your text tool, set to create as Vector, size 400, stroke width 10
I used the lower case letter “ Q “ q “
6. Go to objects, Allign, Center in canvas
7. Using the guide bars stretch the top and bottom of your heart
To fill in the canvas a little more, and recenter
8. Go to layers, Convert to Raster Layer
8. Now make your background layer active
9. Copy and paste your tube as a new layer
10. Resize your tube layer to about 60%
11. Now go to Effects, Mura Meister’s Copies
Using the following settings
 12. Select and make your heart layer active.
13. Using your Magic Wand tool select inside the heart fill area
14. Go to Selections, Modify, Expand by 4
15. Again to Selections, Invert Selection
16. Make you tube/copy layer active and click delete
This should leave you with a solid heart outline filled with a wallpaper
Of your tube image.
17. Selections, Select none
18. Still on your now cropped Wallpaper Layer go to Adjust, Colorize, and
Adjust the color so that it is shaded Red. This layer now acts as the filling for the heart.
19. Make sure your heart layer is active again and go to Effects, 3D effects, now
Select an Inner Bevel that looks good to you.
I used the following settings for mine
 20. Close out your background layer then go to Layers, Merge, Merge Visible.
21. Now Duplicate your merged layer, and move the copy under the original.
22. With your duplicate layer selected go to Effects, Distortion Effect, Twirl
Set to 360 degrees. Repeat this step twice more.
23. Reduce opacity on your twirled layer to about 45%
24. Again go to layers, merge, merge visible.
( You can now make your background layer visible again if you like.)
25. With your merged layer active go to Image, Resize, resize by 90%, and move toward the top of your canvas a little.
26. Once you are comfortable with the placement of your heart, copy and paste
Your tube as a new layer, and position where you want it.
27. Now add a drop shadow of your choice. I used
Vertical 3, Horizontal 3, Opacity 85, Blur 10, Color Black
28. Go to Image, Resize, 60%, make sure All Layers is checked.
( you may need to sharpen your image after this)
29. Add the Artist Copyright, your information, and Name
30. To save as a Jpeg go to Layers, Merge, Merge All/Flatten and save
For PNG or PSD format go to Layers, Merge, Merge Visible
And Viola! You are done!! Hope you enjoyed this fairly simplistic tutorial
Subscribe to:
Post Comments (Atom)


0 comments: